I've touched on a few rigging bits here and there throughout my blog, though it's quite scattered so it seems like a good idea to try and tie as much as possible together in the one article.
When the kayak arrived it was quite basic to say the least, the seat needed attaching and that was about it. There was a centre cover between your legs when it the seated position, though it actually offered very little in the way or storage, it was ok for a few smaller items. A point to note is that it's not officially watertight so I'd not recommend putting car keys or mobile phones in there.
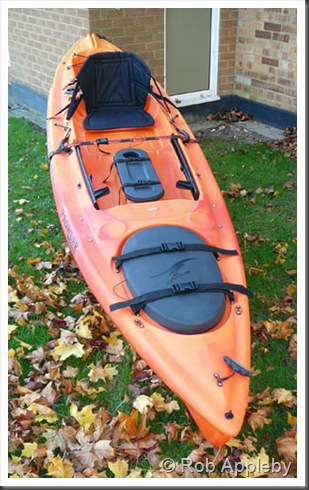

The first thing I tackled was the anchor system. A trolley system was to be fitted to the left hand side (purely as I'm left handed) utilising as many of the
existing fittings as possible. A lot of surfing on the
internet was done picking the brains of other folk. A couple of pulleys and carbine hooks were purchased, along with several metres of black cord and a short length of bungee cord. Time was taken, using masking tape to position the trolley, several options were tried before I finally settled on a design.
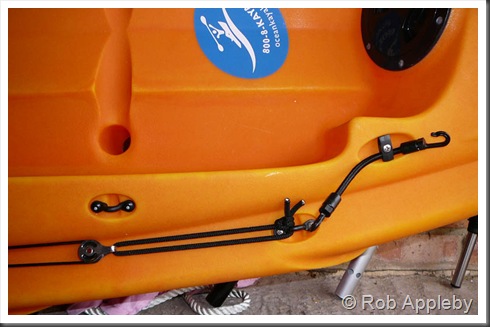
The photos below show the general layout, with a loop of bungee cord at either end to help absorb some wave action, making the 'ride' somewhat smoother. Each loop of bungee was attached to a stainless pulley. The pulleys support the actual anchor trolley which is made from strong cord of around 4mm. A carbine was fitted to the trolley to allow my anchor set to clip on and off quickly and easily, and to position the anchor as required, i.e fore or aft.
A zigzag cleat was also fitted to allow the trolley to be locked inposition when anchored, in order to prevent potential slippage of the trolley which could be dangerous. Towards the front of the trolley, though still reachable from a seated position, a standard cleat was fitted to allow recovery of the anchor, a plastic one was originally fitted, though this was later updated to an alloy item.
Anchor Trolley System



The anchor itself is a simple affair, a 1.5kg grapnel anchor with a metre of chain attached to the main line of a 'ratchet type' dive reel with a buoy threaded onto the main line. A short length of rope attaches the reel to the anchor trolley system with the use of another carbine. This is clipped to the carbine that already exists on the anchor trolley. The chain is permanently attached to the bottom of the anchor, whereas a weak link is used at the top. Should the anchor get stuck, a firm pull causes the weak link link to snap and the anchor to be recovered inverted. Sometimes the anchor is so badly fouled you wont get it back despite the use of a weak link!.
Should there be a requirement, the anchor can be un-clipped from the trolley and left in the water, the buoy will always float enabling the dive reel and attached rope to be easily recovered and re-clipped onto the trolley. This is a valuable feature should you wish to pop back to shore for a moment, retrieve something that you've dropped and is floating away, or to assist another kayak fisher for one reason or another.
Anchor Setup

The second requirement was to fit rod holders. A lot of people seem to fit them up front where two circular mounting areas exist. This appears great, though try reaching them from a seated position!. It really wasn't suitable so an alternative was required. I settled upon using RAM tubes mounted just aft of the seat. With the tubes locked forwards at around a 30 degree angle an 'armchair' fishing position was achieved, perfect. They can also be angled in any position, enabling them to be pointed outwards for maximum rod spread when trolling, or folded back out of the way when paddling.
The RAM tubes were fitted to the sides as shown, though because of the nature of their design all of the weight of the rod is rotating forward (as opposed to supporting the rod in the middle) putting quite some stress onto the base fixing. To make sure this wasn't going to be an issue a strip on nylon cutting board, maybe 8mm in thickness, was cut and placed inside the hull. The fixing bolts passed through this board providing a lot of re-enforcement. The end result was an extremely sturdy fixing.
Rod Holders
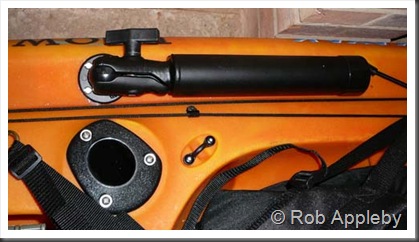

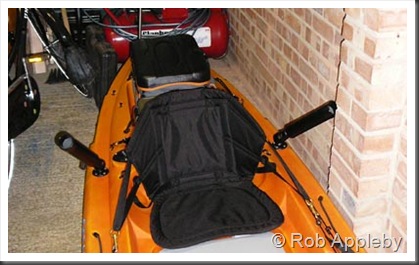
A word of warning with the RAM tubes, glue the rubber end caps on!, otherwise they'll soon be lost. They do require a very good 'nip' when locking them in position, otherwise they have a
tendency to droop over time. Otherwise they are a great bit of kit.
There's a separate article on fitting the centre hatch, see the link below. Though do not purchase a 'revised hatch', fit the 'original hatch' as it's a far superior item.
http://saltwateryakfisherman.blogspot.com/2008/12/big-game-hatch-upgrade.html The fitting is very simple, carefully mark and cut out the aperture as per the supplied instructions and bolt in. What you end up with is a big hole enabling acees to the inside of the yak when the cover is removed. This isn't really that useful so it's worth fitting something like a collapsible bait bowl inside the yak to make is more user friendly. I fitted a washing up bowl that can either be fixed or slid out of the way when required.
Centre Hatch Installation


Note that I fitted lanyard to the hatch cover, if you accidentally drop it over the side you'll have to buy a complete new hatch assembly to get a replacement hatch cover.
A
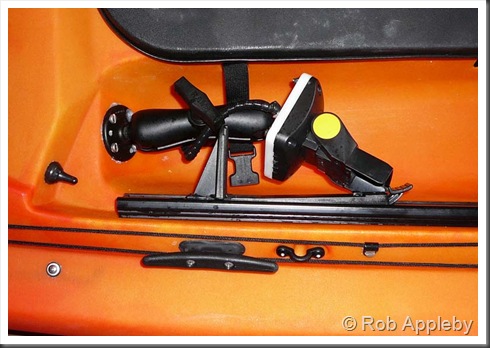
fishfinder and separate GPS were fitted to the yak, again there's a separate article reference the
fishfinder installation within my blog.
http://saltwateryakfisherman.blogspot.com/2008/11/hummingbird-565-fishfinder.html The GPS was very straightforward to fit. A G
armin Marine Mount was
utilised along with a
Garmin DC power adapter lead. The latter enabled the GPS to be powered directly from the kayaks battery, with the unit reverting to the internal batteries should the yak
battery fail.
Fishfinder & GPS Installation

The battery is a 12V 12Ah item, fitted into a watertight box with a marine plug & socket fitting. Originally I had the battery sitting in the battery tray aft of the front hatch, open to the elements, though this quickly lead to corrosion on the battery terminals, hence the unit was fitted into a watertight box. It is still fitted in the battery tray as shown below.
Battery Installation


An anchor light was fitted to the rear of the kayak, a legal requirement for night fishing. As the yak is so small a fixed white light (i.e not flashing and no red/green nav lights) is adequate. A pole light was purchased and fitted as shown below. All the electrically looming on my kayak is fully sealed against the ingress of water.
The lamp, as purchased, tuned out to be rather poor in its design, and saltwater was able to contaminate the electrical connections. I modified the electrical connection introducing another marine plug socket (same as used on the battery) to overcome this problem. A waterproof on/off switch was fitted up front adjacent to the fishfinder.
Anchor Light Installation

Note: The photo above shows the prototype loom prior to the marine plug/socket arrangement being utilised. The power loom is now fitted directly to the socket and not to the base of the lamp as shown above.


One of the last things I did was to fit some storage space in addition the the centre hatch. I've tried a couple of things, though I settled on a Yakmate 3 and a Marine Box, the latter supplied from Solent Plastics. Both are secured using bungee cord and stainless fittings as shown. Removal and fitting takes seconds.
Storage Solutions


The
Yakmate 3 is covered in more detail here:
http://saltwateryakfisherman.blogspot.com/2008/11/yakmate-3.html I've since added a rudder which has turned out to be a most worthwhile addition. Look in the 'rigging section' for further details.
Fully Rigged Prowler Big Game

Please feel free to comment.


