
It's been three weeks since I posted a report covering my fishing trip to Wraysbury Lake. When the opportunity arose for another trip I grabbed it, quite eager to try my luck at catching another large Pike, perhaps even the elusive Perch. I say that the Perch are elusive, though it's probably more down to the fact that bar a couple of tiddlers that I'd caught previously, I'd not actually seen a Perch of note in the flesh so to speak.
The plan had been to meet up with Ian Harris and David Morris to fish both days over the weekend. The weather forecast wasn't exactly favourable, though the margins are generally quite heavily wooded so there's generally always shelter to be found. I was already fairly organised, or was it more a case that I'd not really unpacked from my previous trip?

It was also an opportunity to test out my new LiFePo4 (lithium iron phosphate) battery, a whopping 23ah that I deemed necessary to power my Lowrance HDS9 Carbon combo FF/GPS unit. Though my HDS7 Gen 3 was also killing off my 12ah SLA battery in any session over 6 hours. These big display units are actually very nice to own, though there is one big cost.... current draw!. However, I'll look more at batteries in a later article.
The alarm went off at 0600 and by 0745 I'd hit the road having already loaded the kayak and consumed a large coffee. It's an hours drive to the Wraysbury complex for me, quite a pleasurable one at that time of the morning. It was a different lake to what I'd previously fished and it certainly looked interesting, what with numerous islands and a few backwaters, there was plenty to fish or just to explore!. I'm not sure what time we launched, probably by 0900, though how I'd love to slip into the water there at 0630.
I'd had a look on the Insight Genesis webpage to check if the lake had been previously mapped. Sadly there was nothing, so I planned to map as much as the lake as reasonably possibly during the session. I had actually hoped to utilise Navionic's SonarChart Live, though it transpired that my Navionics Gold card didn't offer that facility. I do have a more up to date card in the post, however, using this feature will have to wait until at least my next trip. Creating your own charts on the go?, that has to be a good thing... watch this space.
I do like fishing alone at times, just enjoying a venue, the time of the morning, etc. Once launched I headed around the corner into quite a large bay. I trolled the margins a couple of times and then covered the remainder of the bay casting methodically. Third cast saw me hook up into a fish!. It was a 'jack' pike of 3-4 lbs, no complaints as it meant that at least I wasn't going to blank!
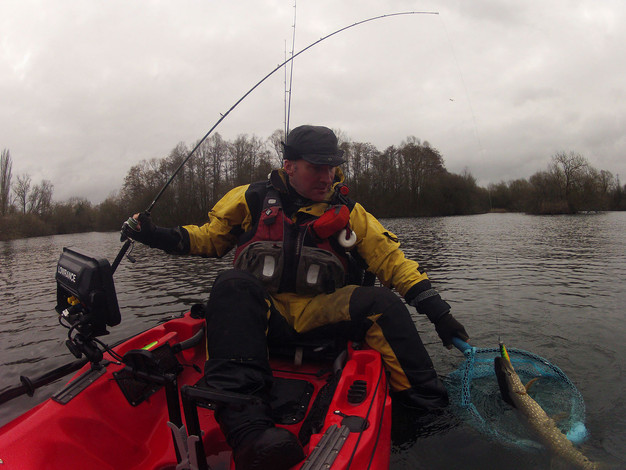
I did try to get a decent photograph of my first fish of the day, though it didn't want to wait about...

I caught three fish in quick succession, all a very similar size. All were taken on a Fox Rage Pro shad mated to both 10g and 15g jig heads. I find the 15g ideals for trolling in depths of up to 5m with the 10g ok for casting, perhaps even a 7g would work just as well. Though they are quite prone to damage and the two I had with me became somewhat unusable within a couple of hours.

I'm sponsored by Lowrance so I'm somewhat spoilt when it comes to electronics. This day I had the latest HDS9 Carbon fitted. It has a 9" screen and this enables me to split the screen into three sections with ease. As I was mapping the lake I chose to have a map overview displayed along with Broadband sonar and StructureScan . As much as I didn't have a usable chart loaded, it enabled me to see what areas of the lake I'd covered. Helpful both in mapping and ensuring that I'd potentially covered all fish holding areas (note the left section of the display below).

What there is as this venue is an abundance of wildlife, I spend probably too much time listening to the variety of bird calls and try to locate the various species in the tree tops. Am I a closet 'twitcher' ?.. perhaps. Though I did enjoy watching a pair of Red Kites for almost an hour, very graceful birds.
I left the bay and headed along a narrow stretch of water. I was regularly getting brief hits to my lure, the number of failed hook-ups was numerous to say the least. Small Perch or Pike no doubt, both frustrating and entertaining at the same time.
I left the bay and headed along a narrow stretch of water. I was regularly getting brief hits to my lure, the number of failed hook-ups was numerous to say the least. Small Perch or Pike no doubt, both frustrating and entertaining at the same time.
The fish kept on coming, though they were generally quite small in size, feisty though!. Like most anglers I do at times lose a little too much tackle. I can go weeks without losing something, then lose 7-8 lures in a session!. It's always nice to get a little payback, so when I spotted a lure in a nearly tree I couldn't let it remain there.

I have to admit that today did not result in many notable photographs. I caught a nice double figure Pike and it gave quite a memorable fight. It was eventually netted and quickly unhooked, ready for its photo call... it had other ideas (again!).

So I can catch fish, just not photograph them apparently. It seems that it's safer to photograph them in the net first... here's a Pike in the net :)

The fish just kept on coming, here's another one...
I'm often asked about using Side Scan sonar (Lowrance StructureScan), is it worth it?. Well traditional broadband sonar, even down imaging, covers only a small area of the water beneath the kayak. Yes, the deeper the water the greater the coverage, though in reality that area is still very small. Being able to look 15-25 metres either side of the kayak with ease?, well that's somewhat priceless. It's possible to pass directly over a featureless bottom whilst being totally ignorant to both fish and structure that may exist either side of the kayak. Look at the screenshot below:

The traditional broadband sonar (top right) is showing a rather featureless bottom, increasing in depth over time. Though look at the StructureScan directly below. To the left are several raised areas of terrain though to the right it's somewhat bland. Well how does this help?, turning around and heading back a few metres off to the left will put you onto potentially fish holding structure. I cant see any fish on that particular screen shot though it doesn't mean that there are none there. I used this method many times throughout the day and it provided me with hook-ups on several occasions.
How do fish appear on the StructureScan?. Well that depends on various factors including fish size, water depth as well as there's position relative to the sonar (i.e beneath or off to one side). Below are a couple of images of what I'm talking about. The first picture below shows a shoal of Carp pretty much directly beneath the kayak. They are clearly visible to the left of the display on the Broadband sonar as large 'fish arches'.
How do fish appear on the StructureScan?. Well that depends on various factors including fish size, water depth as well as there's position relative to the sonar (i.e beneath or off to one side). Below are a couple of images of what I'm talking about. The first picture below shows a shoal of Carp pretty much directly beneath the kayak. They are clearly visible to the left of the display on the Broadband sonar as large 'fish arches'.

Though on the StructureScan display to the right (above) they are clearly visible towards the bottom of the water column (even Carp shaped!) as well as some shadows off to the right created by fish. Shadows?, sonar like light will create shadows due to being unable to pass through an object. It's not terribly clear on the image above, though how about this image below?

There are clearly two fish (white marks) about 9 metres to the left of the kayak, now several metres behind the kayak. As they are off the bottom they are casting a 'sonar shadow' immediately to their left and can therefore be confirmed as fish. This shadow can be used to provide an idea of the depth of the fish. Also, note the methodical mapping track. Parallel tracks to ensure total coverage. It also helps to cover all possible fish holding areas to a good degree.
I actually targeted those fish above by tapping on the display on the HDS9 Carbon and selecting the 'GOTO' option. I was steered directly back towards these fish as can be seen below to the left of the screen. Out of interest you can also see another large fish on the broadband sonar below (top right) lying hard on the bottom at around 4 metres, seen whilst navigating back towards the two fish I highlighted on the StructureScan... fish everywhere!

That fish above that's lying hard against the bottom was most likely a Pike. With the water temperature so cold these fish are lying deep in the water, a clue being the leeches that are attached to pectoral fins of the fish that are caught during the colder months, this can be seen below.

These end up littering the kayak after a few fish, it's become pastime to locate them and ditch them overboard during those quieter moments.
With my two fox lures destroyed it was time to try out my new collection of Westin lures.
I'd previously had some great success with the Westin Shad Teez (below), not doubt very effective due to its famous rolling action. Sadly my only 'Crazy Deal' colour Shad Teez had been chewed up beyond recognition so I decided to try another Westin lure from my box.

Out of the box came my one and only Hypo Teez, well in this particular colour scheme (below).

I mainly trolled this lure and it was smashed in the first 10 seconds!, trust me, that builds your confidence in a lure VERY quickly!. It took many Pike during the session and it showed very little wear considering the abuse it took. It doesn't possess the rolling action of the Shad Teez, though the paddle tail creates very effective movement. I'll certainly be adding several to my collection, though I'll also use them with 7-10g jig heads for casting purposes, especially into shallower water.
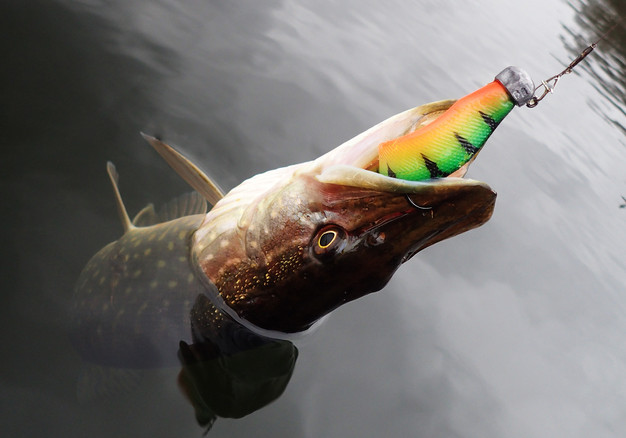
As mentioned, the Hypo Teez was killing the Pike out in the lake (not literally!). Below is what became a common occurrence... an 'inhaled' Hypo Teez. At times unhooking required forceps. Note the lure clip!!!!. I'd had problems with the clip on the previous fish. False economy for sure. Next time a lure clip shows signs of damage it gets changed. Last thing you want to do is lose a great fish or leave your lure in the mouth of a fish.. best avoided wherever possible.

This fish stayed deep for some time before I managed to lift it off the bottom and bring it up towards the kayak. It still had plenty of life remaining even then, stripping line from the reel as it so wished.
Point to note - Two days earlier I'd taken deliver of a new XL Savage Gear folding landing net. It seemed huge compared to my Bass Pro scoop net which is 50cm long so I made the decision to leave it at home.
The fish surfaced and it was far bigger than I'd expected. I knew it was a decent fish, but no, this was a very big fish. I could see that it was very lightly hooked (in the cheek) so I didn't want to put excessive pressure onto it by bringing it next to the kayak to hand lift out. Despite knowing the net was too small I had a plan. Get its head into the net and somehow grab its tail and bring it aboard. Well that was the plan......
Below is a video of the result.
Yup, it was very painful. I did regret leaving that nice new big Savage Gear landing net at home... several dozen times in fact. That said, its handle is way too long and I don't want to have to pull out the handle each time, it needs modifying for kayak use.
Though that decision did cost me what was probably my biggest ever Pike.... what could have been.
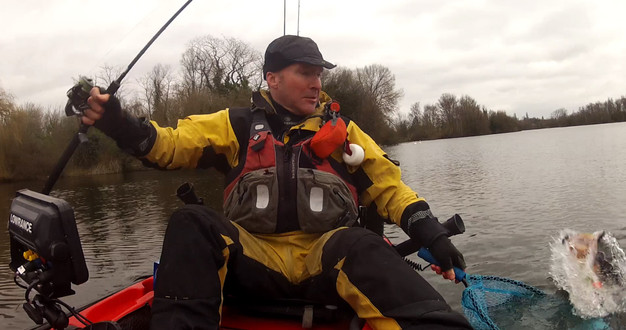
I wont lie, I was feeling rather glum for at least 10 minutes. A packet of Jaffa Cakes later and moral was mostly restored. Ok, I'm lying, I was gutted for several hours.
I continued to map and fish the lake. It proved to be fairly featureless in the deeper areas, bar the odd bank and depression here and there. Though I did pick up a large area of rough ground several metres off to one side (thank you StructureScan) so I cast a lure in that direction. After allowing it time to sink i started a slow retrieve. Literally 3-4 seconds into the retrieve it was smashed and it didn't feel particularly 'Pike-like' .... and it wasn't!.
It turned out to be a cracking Perch which slipped very nicely into my 50cm Bass Pro net!. I don't think it was my biggest Perch (currently 46cm), though as I didn't take a measuring board I'll never know. It was back in the water within a minute, quickly unhooked, a flurry of photos before watching it plunge back down into the muddy depths.


Catching that Perch certainly eased the pain of having lost that big Pike an hour earlier and it was a really great way to wrap up a cracking session afloat. Ok, I said that I'd stopped counting at 15 Pike, 18 was the final count, plus a nice big fat Perch!
The LiFePo4 23ah battery was still holding 60% of its charge after the 6+ hour session. That's well on target to it's expected 13-15 hour life that I'm expecting for the HDS9 Carbon FF/GPS or over 25 hours for the Elite 7 Ti. That's pretty awesome, I could use the Elite 7 Ti for a long weekend away on one charge. That said, a full charge only takes 4 hours, that's super quick by SLA standards.

If you'd like the chance to kayak fish at the famous Wraysbury Lake complex why not come and join me and many other kayak anglers at the London International Kayak Fishing Festival. At £40 for the 3 day lure only predator competition, including camping, it's going to be a very special event.
Put the dates in your diary: June 9-11th 2017
Put the dates in your diary: June 9-11th 2017
Here's the promotional video below.


